


tired of the look of your home. one of the least expensive ways to improve and change the look of your home is painting. the first surface that people think of painting in their homes is the walls but there are so many more surfaces that you can paint from the cabinets to the floors.
here are directions and some tips to painting all the unusual surfaces that you wouldn’t normally think of painting.
NOTE: it’s always a good practice to clean all surfaces thoroughly with trisodium phosphate (TSP) once you’ve sanded them. TSP can be purchased at any home improvement store.
hardwoods

prep – lightly sand floors before painting. if the surface was previously painted scrape to loosen rough paint and then sand down. clean the excess dust before going any further.
painting – no need to apply primer. apply 1 thin coat of polyurethane based porch and floor enamel (you can thin with 10% paint thinner.) follow this coat with 2 full-strength coats. allow coats to dry fully in between each coat. you will want to stay out of the home for the duration of the project due to the strong fumes.
cabinets & laminate countertops
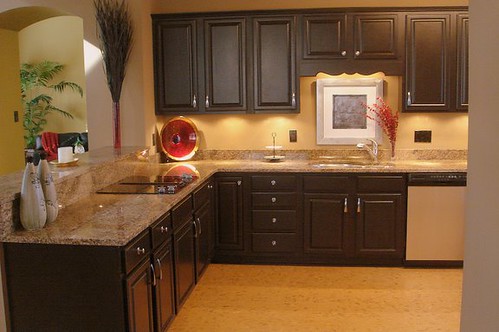

prep – scuff and sand surface with 120-grit sandpaper. for cabinets, all doors should be removed as well as hardware(hinges included). for countertops, tape off any areas you don’t want to get paint on such as surface mounted sinks and faucets.
painting – apply 1-2 coats of a good oil-based primer. you can talk to your favorite home improvement store’s paint department to see what primer they recommend. then use a high density foam roller to roll on 2-3 coats of latex paint in the finish of your choice. you can use a paint brush to get into the creases and crevices that a roller can’t get to. painting countertops is only recommended for those that get light use. for extra durability on countertops, apply an alkyd urethane; however, this creates an amber-colored sheen so keep this in mind if using lighter paint color.
ceramic tile

tip – do not paint tile that gets wet regularly such as a tiled tub surround. i found a lot of sites that said it was ok to paint floors but i would be hesitant about that. i’ve never personally done it or see it done. i would be afraid it would scratch too easily.
prep – scuff and sand surface of tile with 150-grit sandpaper, then wash with equal parts water, vinegar and bleach, to kill fungus. let dry. glossy tiles require extra sanding.
painting – prime 1-2 coats with super adherent oil-based primer. (ask your favorite home improvement store for recommendations). apply primer with brush in the corners and a short-napped roller on the main area. once the primer is dry, take a fresh sheet of 220 sandpaper and make a very light pass over the primed surface. you are not trying to remove the primer, you simply want to remove any small burrs that may have risen out of your roller cover and make sure that the surface is perfectly prepared to receive paint. apply 2-3 thin coats of an oil based semi-gloss or high gloss alkyd for your top coats. you want to build up the strength of the paint adhesion by adding multiple lightweight layers, not one heavy one.
appliances

note – i’m putting a disclaimer here, in the design world this would typically be a no, no but this could be an option for someone on an extremely low budget.
tip – you should only paint appliances where heat is not a factor…refrigerators, freezers, dishwashers or washers.
prep – scour the surface of the appliance with an abrasive wool pad. ensure that all surfaces to be painted are scoured thoroughly. sand the surface of the appliance with course sandpaper. wipe down after sanding and sand again with medium grit sandpaper. this will allow the paint to adhere properly to the appliance's surface. if the appliance is showing signs of rust make sure to apply several coats of anti-rust spray or spray primer.
painting – once appliance has been prepped properly use a spray on appliance paint. this can be purchased online or at your favorite home improvement store. refer to individual product directions. be sure to spray evenly and let each coat dry before applying the next coat. you’ll get a better finish if you do that.
metal

prep – if rusted, sand or use a wire brush on the rusted areas. you can use an oil and grease emulsifier to clean the surface.
painting – select the appropriate primer. for a metal filing cabinet use a spray primer. follow primer with a rust-resistant spray paint in the color of your choice. wrought iron usually needs a red-oxide primer. if the surface is rusted, spot-prime with a rust-inhibiting or metal primer. Paint the iron with a good quality exterior metal paint, either by brushing or by spraying it on.
concrete or cement flooring

prep – thoroughly clean the surface to be painted. it is crucial to remove any oil or grease from the surface. large grease stains can be absorbed in part by kitty litter and then scrubbed out with the TSP solution using either a mop, a scrub brush or both. be sure to rinse the floor thoroughly and let it dry for several days. if you have any cracks or holes in your concrete, fix them before you paint. you can use a concrete patch, or hydraulic cement, to smooth over any rough surfaces or holes. consult the manufacturers recommendations for how to apply the concrete patch and how long it should dry before being painted. before you begin painting a concrete floor, make sure the concrete is completely dry and free of leaks.
painting – paint one coat of concrete primer. let dry thoroughly. follow with 2 coats of concrete floor paint or polyurethane floor enamel. for added protection, apply an alkyd urethane. when painting, cut in corners first. pouring a pool of paint directly on the floor and then rolling it out with a roller works best. work from one end of the room to the other.
hope you enjoyed this “how to” session. what unusual surface have you painted recently?


No comments:
Post a Comment
I love to hear your comments. Thanks for leaving one. xo, Cristi